Most people like a good cup of tea! This is category being chosen for this exercise: Making a cup of Tea.
The main ingredients and utensils for making tea are as follows:-

There is a question mark beside the sugar/sweeteners as this is based more on personal choice so I decide to leave these out. Also I decide on tea bags rather than loose tea as tea bags are so convenient and used by the majority.
Searching through cookery books leads to finds of instructions and photographs of the tea making process. However the instructions are for loose tea and who has time to “warm the pot” these days:-

I list the way that I make tea:-
- Fill the kettle with water from a jug
- Put the kettle to boil
- Put two teabags in a teapot
- Pour boiled water from kettle into teapot
- Fill milk jug
- Stir teabags in the teapot
- Pour milk into tea cup
- Pour tea into tea-cup
- Stir tea
However I know some people prefer to put the milk in after the tea. I consider it best to keep things simple and not concern too much about individual differences. These are basic instructions which can be suited to personal requirements if necessary.
In collecting reference material this is a good opportunity to practice a mood board. Feedback from Assignment Two recommended researching mood boards further and having done so I want to complete a selective clear moodboard rather than a “busy” collage one:-
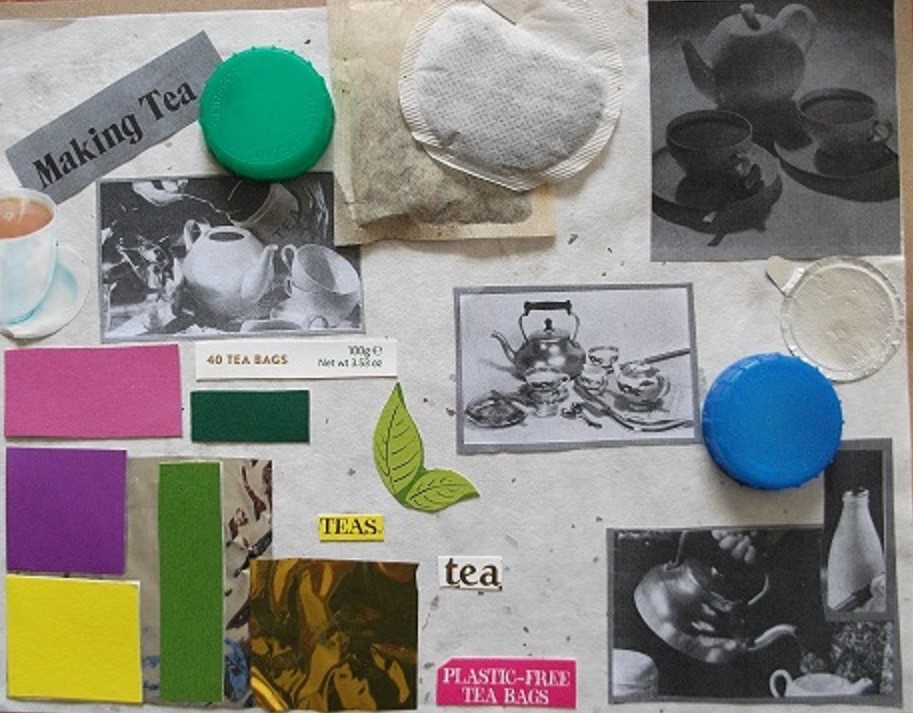
I feel this is the most successful mood board to-date. It is clear, not too cluttered and as well as photos of tea making it includes physical elements of teabags and bottle tops. The cut off coloured cards allows for the variety of teas. I like the black/white pictures as it gives a sense of timelessness of tea manufacturing and tradition. Whilst teas are associated with countries eg India, China and English company regions eg Yorkshire (and have so many other elements – herbal, soothing, comfort, company etc.) I want the mood board to reflect the process of tea-making more than anything else.
It is Saturday morning 6th June and in the kitchen I draw directly from observation to start to work out the tea steps visually:-

The hierarchy needs some thought as the kettle seems to be the most important in these sketches and I might not wish this to be the case. I continue with these drawings:-

I decide to leave teaspoons aside as it will over-complicate the design. Now it is about working out whether to combine the imagery in places for example where the the milk and tea is being poured into the cup. Questions need to be asked: Is the overall format going to be in individual squares, or linked. Do I keep to the arrows or try to depict a hand pointing or holding the handles/lids. What order do the pictures need to be in . Do some need to be bolder and larger than others, How about the hierarchy and detail? The use of colour?
At this stage I stop and do indeed have a cup of tea !. After which it seems sensible to photocopy the sketches to separate them and move them about.
I try starting with the milk bottle however the stages do not seem to follow in sequence very well.

So the next trial starts with the water from the tap. This works a little better and is more in order.

So now I consider making the water/tea process of the tea making more distinct from the pouring of the milk by placing the water mechanics of heating water in the kettle and filling the tea pot on the right side of the page, then the milk bottle and milk jug on the left:-

This seems to work ok. You can follow the steps from the top of the page like a cascade and this brings reminders of the a previous exercise in Coursework Two when looking at metaphors of the tap water falling in droplets into the bucket.
Perhaps I can do something similar by placing the teapot at the top of the page as though it is pouring tea in droplet stages into the cup:-

I try tea”droplets” around the pictures.

Now the layout has been established it is time to start thinking in terms of hierarchy ie.the teapot and ultimate cup of tea both need to be larger and the kettle smaller. I could colour the water/kettle/teapot droplet stages blue and the milk bottle/milk jug droplet stages yellow so they are clearly two different aspects of the process:-

Despite some effort on this exercise I feel it is not really coming together as I would wish. Perhaps the idea of droplets to indicate the stages of tea making inbetween the drawing of the teapot and cup of tea is a little too complex for my ability to convey this message at this early stage in the course and a more simplified approach would have been better. However I shall work with the design and see if I can at least improve the appearance on the computer.
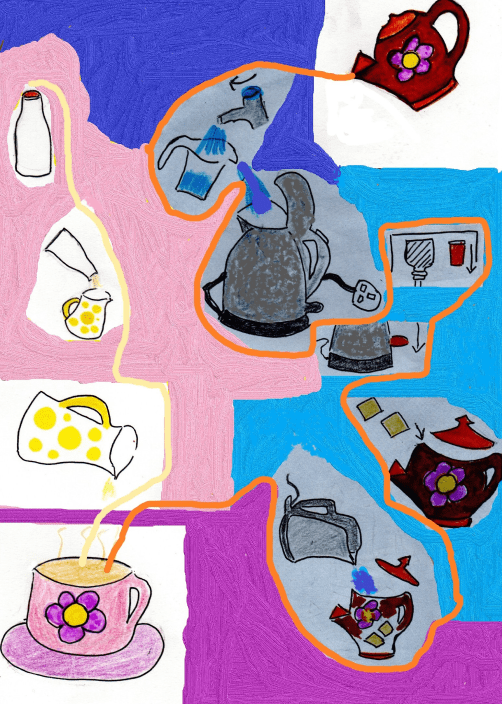
I am resolving the connectivity issue by drawing lines of the way the tea and milk would pour into the cup. I have kept the drawings at a level to give a young feeling for a young audience. Some of the drawings are a little small and I think if I were to repeat this exercise I would try to use the space on the paper better. Looking again at the design only one picture of the spotted milk jug is really needed. Also there needs to be more realism in the relative sizing of objects eg make the teapot large and the cup & saucer smaller. I can also see some problems in interpretation eg people rarely use standard glass milk bottles now, so would it be advisable to write milk on the side of the bottle or draw a standard supermarket one. Also not everybody has a switch at the base of the kettle, however hopefully it is understood from the diagram to switch it on. I think I could have shown the kettle unplugged again when it is pouring the water into the teapot.
Finally I decide to have another go at drawing the items on a larger scale and removing some of the steps from when the water is poured from the kettle into the tea-pot.
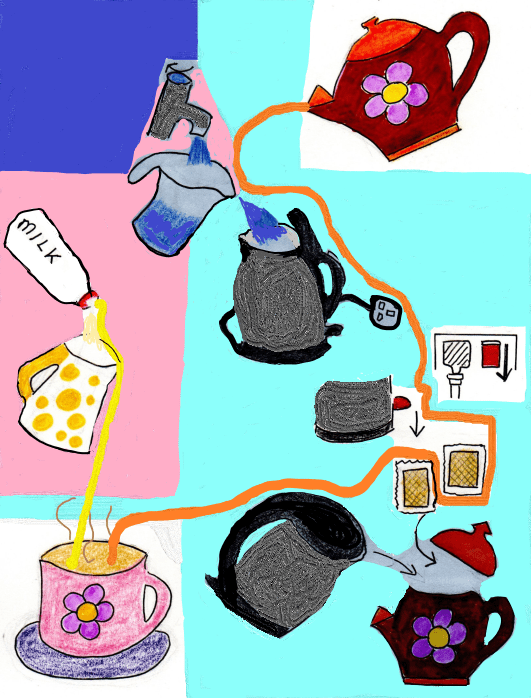
This exercise has demonstrated to me just how technically difficult it can be to provide visual instruction for a customary action.
I put off completing this exercise as I became a little stuck before I was able to solve the problem with the connecting lines. It was only in trying to improve the design and working on it that I came up with the solution in the process. If I had been able to work out the solution before hand I may have felt more positive when drawing the images . So really the overall the illustration could be visually improved however I am glad I was able to find a way forward with it eventually and I now need to leave this exercise in order to meet the agreed date of submitting coursework 3.
